Cara Install Nextcloud di Ubuntu 22.04 dengan Nginx
Apa Itu Nextcloud ?
Pada tutorial kali ini, saya akan membagikan Cara install Nextcloud di Ubuntu 22.04 dengan Nginx dan PHP-FPM. Nextcloud adalah sebuah web aplikasi berbasis cloud storage atau penyimpanan cloud yang bisa digunakan untuk menyimpan, mengakses, dan berbagi berbagai jenis file dan data secara online. Nextcloud ini hampir mirip dengan layanan penyimpanan data seperti Google Drive atau Dropbox, tetapi yang membuat Nextcloud istimewa adalah kemampuannya untuk di-hosting di server pribadi atau di dalam infrastruktur Anda sendiri.
Fitur-Fitur Nextcloud
- Gratis dan open source
- Enkripsi end-to-end, artinya file dienkripsi di perangkatmu sebelum diunggah ke server, jadi meskipun ada yang mencuri servermu, mereka tidak akan bisa membaca file-filemu.
- Bisa diintegrasikan dengan paket kantor online (Collobora Online, OnlyOffice) jadi bisa langsung bikin dan edit dokumen, presentasi, dan tabel di NextCloud.
- Ada toko aplikasi dengan ratusan aplikasi untuk nambah fungsionalitas (macem aplikasi kalender, kontak, catatan, video konferensi, dll).
- Aplikasi sinkronisasi tersedia di Linux, macOS, Windows, iOS, dan Android.
Cara Install Nextcloud di Ubuntu 22.04
Setelah mengetahui apa itu nextcloud dan beberapa fitur andalanya, selanjutnya adalah proses instalasi nextcloud. DI tutorial ini nntuk menginstall nextcloud, Anda membutuhkan sebuah VPS Ubuntu versi 22.04.
Pada Tutorial Install Nextcloud dengan PHP-FPM ini saya menggunakan VPS dengan spesifikasi vCPU 1 Core, RAM 1GB serta SSD 25GB dari provider cloud digital ocean. Jika VPS Anda sudah ada dan siap bertempur, cekidot..
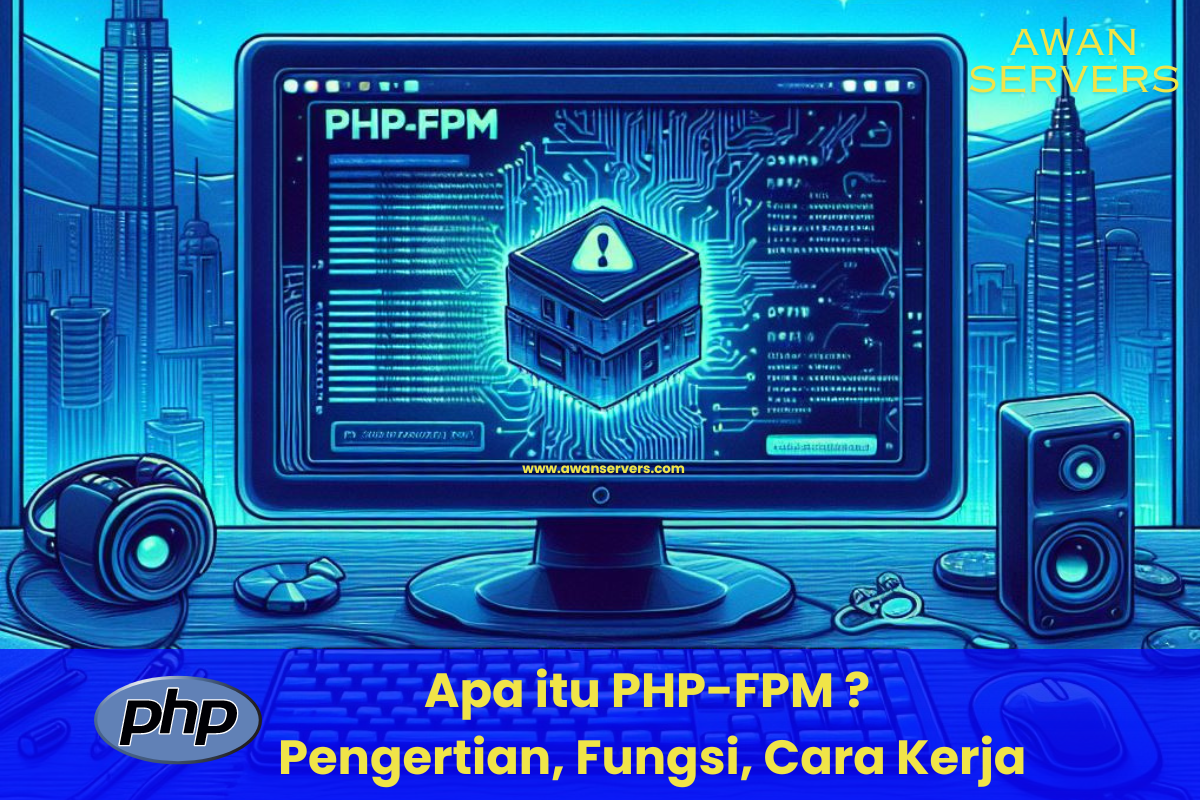
Baca Juga : Apa Itu PHP-FPM ? Pengertian PHP-FPM Fungsi Serta Cara Kerja
Langkah 1# : Menginstall Web Server
Sebelum memulai proses instal-install, wajib untuk mengupdate dan mengupgrade server terlebih dulu.
sudo apt update & sudo apt upgrade -yKarna kita akan pakai PHP-FPM dan menurut saya web server yang dipakai bagusnya adalah nginx. berikut perintah untuk menginstall web server nginx.
sudo apt install nginx -yCek status nginx dan pastikan statusnya running, buat juga agar nginx berjalan otomatis setalah server booting
sudo service nginx start
sudo service nginx status
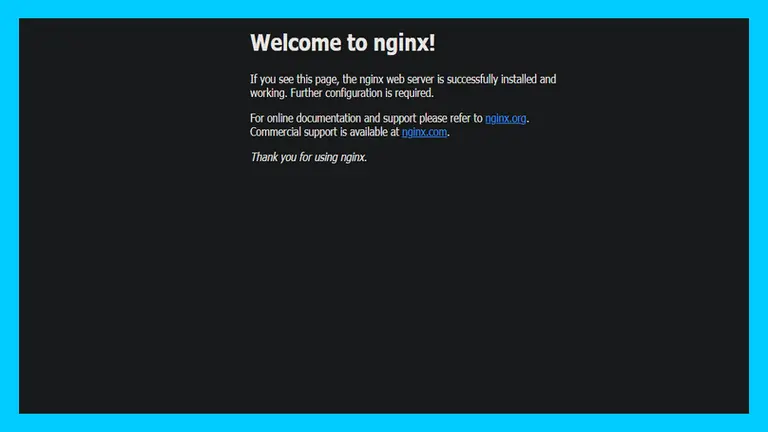
sudo systemctl enable nginxTerakhir cek dengan menggunakan browser, ketik IP Publik VPS Anda, dan kalau berhasil akan muncul page Welcome NGINX seperti ini.
Langkah #2 : Menginstall Mariadb Database
Database yang akan kita pakai kali ini adalah Mariadb Server. berikut cara installnya
sudo apt install mariadb-server -yStart atau jalankan service mariadb setelah proses instalasi selesai, buat juga agar service mariadb berjalan auto start setelah booting. terakhir cek status mysql.
sudo service mariadb start
sudo systemctl enable mariadb
sudo service mariadb status
Service mariadb harus aktive dan running

Langkah #3 : Menginstall PHP dan Modul Ekstensi
Nextcloud membutuhkan PHP karena aplikasi ini dibangun menggunakan bahasa pemrograman PHP, yang berfungsi untuk menjalankan kode server-side dan menghasilkan antarmuka pengguna serta melakukan pemrosesan data.
Pertama Kita install dulu paket dependensi dengan menambahkan repository ondrej php.
sudo apt update
sudo apt install -y lsb-release gnupg2 ca-certificates apt-transport-https software-properties-common
sudo add-apt-repository ppa:ondrej/php
sudo apt update
Setelah repository berhasil ditambah, install php dan modul ekstensinya.
sudo apt install imagemagick php-imagick php8.2-common php8.2-mysql php8.2-fpm php8.2-gd php8.2-curl php8.2-zip php8.2-xml php8.2-mbstring php8.2-bz2 php8.2-intl php8.2-gmpUpgrade PHP Memory limit sesuai yang sudah direkomendasikan oleh nextcloud, yaitu 512MB
sudo sed -i 's/memory_limit = 128M/memory_limit = 512M/g' /etc/php/8.2/fpm/php.iniTerakhir, Start dan enable service PHP-FPM
sudo systemctl reload nginx
sudo service php8.2-fpm restart
sudo systemctl enable php8.2-fpm
sudo service php8.2-fpm status
Langkah #4 : Mendownload File Master Nextcloud
Untuk mendowload file master nextcloud, Anda bisa mengunjungi web official nextcloud di https://nextcloud.com/install . Di tutorial kali ini kita akan menginstal nextcloud versi terbaru.
cd ~
wget https://download.nextcloud.com/server/releases/latest.zip
kemudian ekstrak dengan unzip
sudo apt install unzip
sudo unzip latest.zip -d /var/www/
Terakhir ubah kepemilikan direktori ke www-data
sudo chown www-data:www-data /var/www/nextcloud/ -RLangkah #5 : Membuat Database dan User untuk Nextcloud
Untuk masuk ke server database MariaDB, Anda bisa menggunakan perintah berikut. Karena MariaDB sekarang menggunakan plugin unix_socket untuk mengautentikasi login, jadi tidak perlu memasukkan password root MariaDB. Cukup tambahkan awalan “sudo” sebelum perintah mysql.
sudo mysqlKemudian buat database untuk nextcloud, buat juga usernya agar terpisah dari yang lain dan beri akses user agar bisa mengakses databasenya. seperti ini contohnya, pastikan kalian mengganti ‘your-password’ dengan password yang asli.
CREATE DATABASE nextcloud_db;
CREATE USER nextclouduser@localhost identified by 'your-password';
grant all privileges on nextcloud_db.* to nextclouduser@localhost identified by 'your-password';
Terakhir Flush Privileges dan keluar dari konsol mysql.
flush privileges;
exit;
Kurang lebih beginilah prosesnya

Langkah #6 : Membuat Konfigurasi Nginx.conf
Nginx.conf ini salah satunya fungsinya adalah untuk mengonfigurasi agar Nextcloud dapat diakses melalui domain atau subdomain. Selain itu untuk mengatur SSL dan lainya.
Buat file nextcloud.conf di direktori /etc/nginx/conf menggunakan editor nano atau vim.
sudo nano /etc/nginx/conf.d/nextcloud.confCopy teks konfig dibawah ini dan ganti nextcloud.awanservers.com dengan domain atau subdomain yang Anda miliki. Jangan lupa untuk membuat DNS A Record untuk subdomain ini dan diarahkan ke IP Publik VPS nextcloud Anda.
server {
    listen 80;
    listen [::]:80;
    server_name nextcloud.awanservers.com;

    # Add headers to serve security related headers
    add_header X-Content-Type-Options nosniff;
    add_header X-XSS-Protection "1; mode=block";
    add_header X-Robots-Tag none;
    add_header X-Download-Options noopen;
    add_header X-Permitted-Cross-Domain-Policies none;
    add_header Referrer-Policy no-referrer;

    #I found this header is needed on Ubuntu, but not on Arch Linux.
    add_header X-Frame-Options "SAMEORIGIN";

    # Path to the root of your installation
    root /var/www/nextcloud/;

    access_log /var/log/nginx/nextcloud.access;
    error_log /var/log/nginx/nextcloud.error;

    location = /robots.txt {
        allow all;
        log_not_found off;
        access_log off;
    }

    location = /.well-known/carddav {
        return 301 $scheme://$host/remote.php/dav;
    }
    location = /.well-known/caldav {
       return 301 $scheme://$host/remote.php/dav;
    }

    location ~ /.well-known/acme-challenge {
      allow all;
    }

    # set max upload size
    client_max_body_size 1024M;
    fastcgi_buffers 64 4K;

    # Disable gzip to avoid the removal of the ETag header
    gzip off;

    error_page 403 /core/templates/403.php;
    error_page 404 /core/templates/404.php;

    location / {
       rewrite ^ /index.php;
    }

    location ~ ^/(?:build|tests|config|lib|3rdparty|templates|data)/ {
       deny all;
    }
    location ~ ^/(?:\.|autotest|occ|issue|indie|db_|console) {
       deny all;
     }

    location ~ ^/(?:index|remote|public|cron|core/ajax/update|status|ocs/v[12]|updater/.+|ocs-provider/.+|core/templates/40[34])\.php(?:$|/) {
       include fastcgi_params;
       fastcgi_split_path_info ^(.+\.php)(/.*)$;
       try_files $fastcgi_script_name =404;
       fastcgi_param SCRIPT_FILENAME $document_root$fastcgi_script_name;
       fastcgi_param PATH_INFO $fastcgi_path_info;
       #Avoid sending the security headers twice
       fastcgi_param modHeadersAvailable true;
       fastcgi_param front_controller_active true;
       fastcgi_pass unix:/run/php/php8.2-fpm.sock;
       fastcgi_intercept_errors on;
       fastcgi_request_buffering off;
    }

    location ~ ^/(?:updater|ocs-provider)(?:$|/) {
       try_files $uri/ =404;
       index index.php;
    }

    # Adding the cache control header for js and css files
    # Make sure it is BELOW the PHP block
    location ~* \.(?:css|js)$ {
        try_files $uri /index.php$uri$is_args$args;
        add_header Cache-Control "public, max-age=7200";
        # Add headers to serve security related headers (It is intended to
        # have those duplicated to the ones above)
        add_header X-Content-Type-Options nosniff;
        add_header X-XSS-Protection "1; mode=block";
        add_header X-Robots-Tag none;
        add_header X-Download-Options noopen;
        add_header X-Permitted-Cross-Domain-Policies none;
        add_header Referrer-Policy no-referrer;
        # Optional: Don't log access to assets
        access_log off;
   }

   location ~* \.(?:svg|gif|png|html|ttf|woff|ico|jpg|jpeg)$ {
        try_files $uri /index.php$uri$is_args$args;
        # Optional: Don't log access to other assets
        access_log off;
   }
}
Terakhir tes konfigurasi nginx.conf di atas dan restart nginx.
sudo nginx -t
sudo systemctl reload nginx
Langkah #7 : Enable HTTPS
Untuk SSL yang akan kita gunakan adalah lets encrypt dan menggunakan certbot untuk proses requestnya. Pertama install paket yang dibutuhkan terlebih dahulu.
sudo apt install certbot python3-certbot-nginx -yLalu request SSL Sertifikat Lets Encrypt dengan perintah seperti ini
sudo certbot --nginx --agree-tos --redirect --hsts --staple-ocsp --email [email protected] -d nextcloud.example.comPastikan proses request SSL berhasil seperti ini
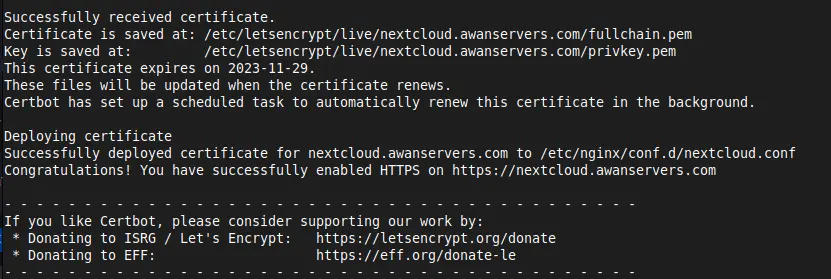
Setelah request SSL berhasil, Sekarang website nextcloud Anda sudah menjadi HTTPS. Sertifikat SSL dari Lets Encrypt berlaku selama 90 hari atau 3 bulan. Nantinya setiap kali sertifikat SSL habis masa berlakunya akan otomatis direnew oleh server.
Langkah #8 : Install Nextcloud PHP-FPM di Web Browser
Setelah semua proses di atas sudah selesai dilakukan. Langkah selanjutnya adalah melakukan instalasi nextcloud di web browser.
ketik domain nextcloud Anda di web browser dan akan muncul page instalasi seperti ini.
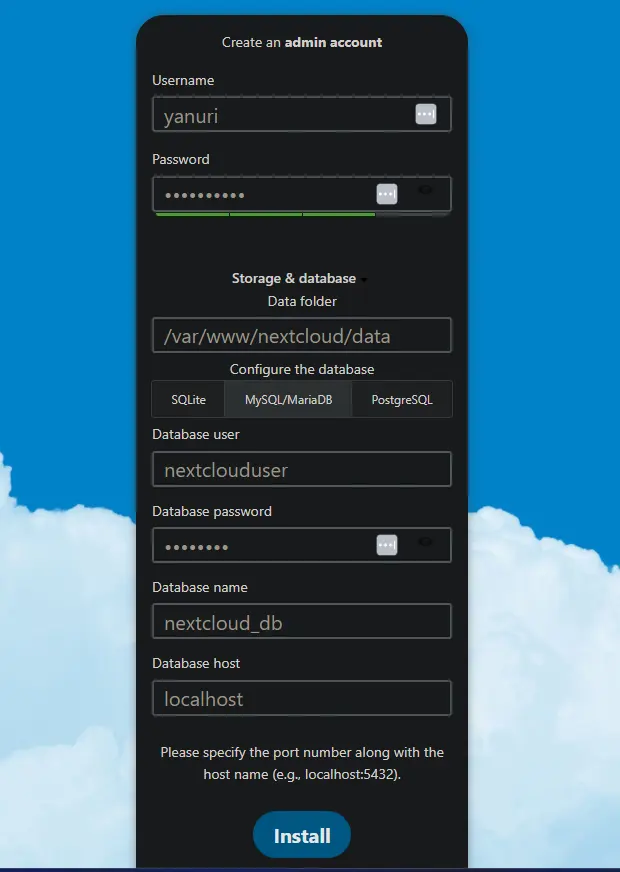
Isi username dan password terserah Anda, Untuk bagian confidure database pilih MySQL/Mariadb dan isi sesuai database ,username, dan password yang tadi sudah di buat. Terakhir klik Install
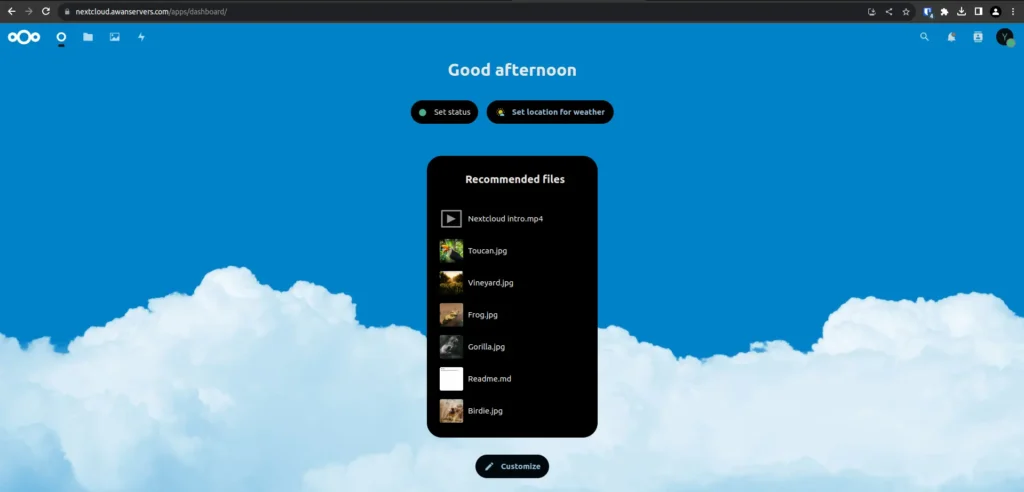
Kalau sudah, akan masuk ke dashboard utama nextcloud seperti ini.
Langkah #9 : Mengonfigurasi Redis ke Nextcloud
Redis server ini akan berperan sebagai penyimpanan cache. Fungsinya agar mempercepat akses dan respons nextcloud. Karena dengan Redis, Nextcloud dapat mengurangi beban server dan meningkatkan kinerja secara keseluruhan.
Pertama kita install dulu redis servernya
sudo apt install redis-server -yKemudian start dan enable redis setelah booting
sudo systemctl start redis-server
sudo systemctl enable redis-server
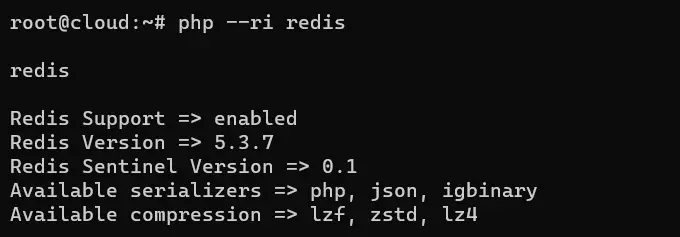
sudo systemctl status redisPastikan service redis aktive dan running. Setelah itu untuk mengkonfigurasi Redis menjadi cache nextcloud, Perlu menginstal ekstensi PHP-Redis agar nextcloud dapat berkomunikasi dengan Redis.
sudo apt install php8.2-redisKemudian cek ekstensi redis dan pastikan sudah enable seperti ini.
Kemudian hubungkan redis ke nextcloud agar menjadi cache.
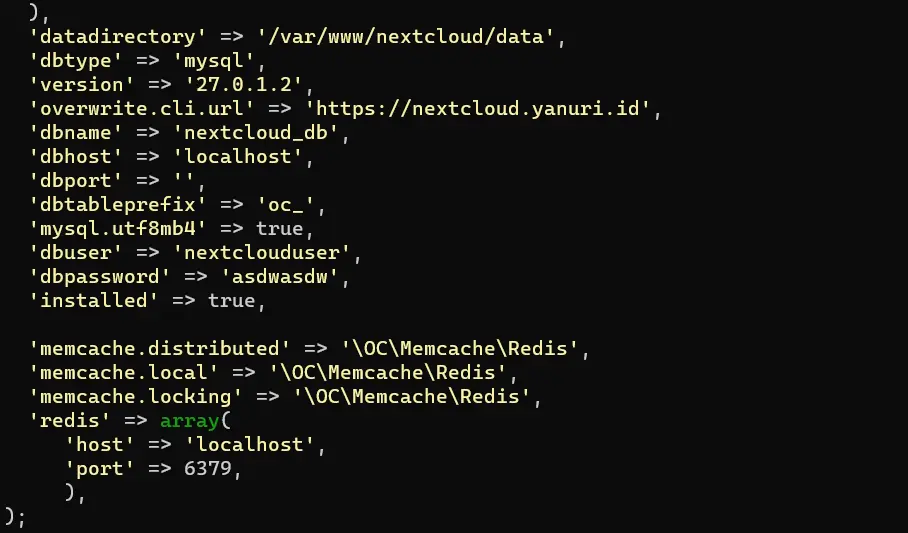
sudo nano /var/www/nextcloud/config/config.phpTambahkan baris konfigurasi berikut di atas simbol );
'memcache.distributed' => '\OC\Memcache\Redis',
'memcache.local' => '\OC\Memcache\Redis',
'memcache.locking' => '\OC\Memcache\Redis',
'redis' => array(
     'host' => 'localhost',
     'port' => 6379,
     ),
Lihat pada gambar dibawah ini ! Taruh di bawah baris ‘installed’ => true,
Terakhir restart service php dan nginx
sudo systemctl restart nginx php8.2-fpmTambahan & Tips Konfigurasi
Berikut ini adalah beberapa tambahan konfigurasi untuk nextcloud, diantaranya troubleshooting error dan reset password lewat CLI.
A. Reset Password Nextcloud Lewat CLI Command
Masukkan perintah berikut untuk mereset password user nextcloud. Ganti nextcloud_username dengan username asli akun Anda.
sudo -u www-data php /var/www/nextcloud/occ user:resetpassword nextcloud_usernameB. Menambah Ukuran Maksimal Upload File
Di sini kita akan mengubah batas maksimal upload file dari yang awalnya 2MB menjadi 1 GB. Berikut caranya.
sudo sed -i 's/upload_max_filesize = 2M/upload_max_filesize = 1024M/g' /etc/php/8.2/fpm/php.ini
sudo systemctl restart php8.2-fpm
C. Menggunakan Cron Untuk Background Proses
Secara default, nextcloud menggunakan AJAX untuk memproses setiap task per load page. Agara penggunaan sistem lebih efisien, Anda bisa menggantinya dengan cron proses.
Pertama masuk ke dashboard nextcloud Anda, pergi ke Administration Settings ->Basic Settings kemudian ganti Background Job ke Cron
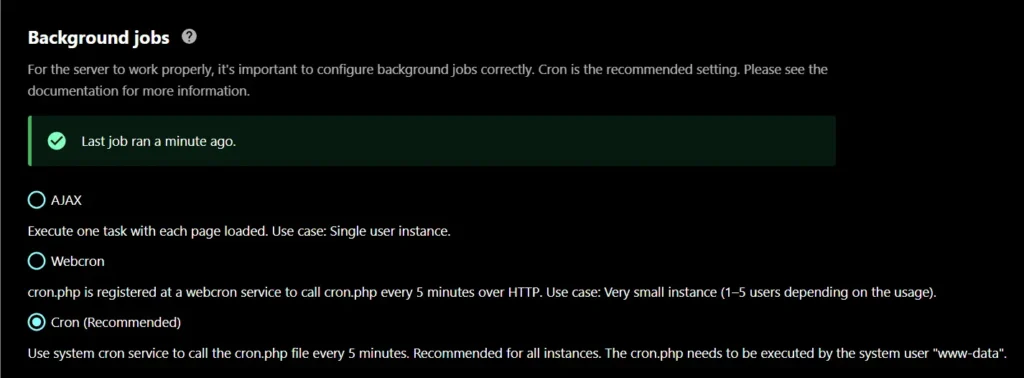
Kemudian tambahkan cron proses dengan user www-data
sudo -u www-data crontab -eTambahkan baris berikut untuk menjalankan cron setiap 5 menit sekali.
*/5 * * * * php8.2 -f /var/www/nextcloud/cron.phpSave dan keluar. Sekarang Background Job nextcloud sudah berganti menggunakan cron.
Penutup
Jadi begitulah cara install nextcloud di Ubuntu 22.04 dengan nginx dan php-fpm. Setelah Langkah 1 sampai 9 sudah dilakukan, harusnya server nextcloud Anda sudah berjalan dengan lancar. Terimakasih sudah mengikuti tutorial ini. Untuk informasi lebih lanjut Anda bisa menulis komentar di bawah atau menghubungi saya melalui email di [email protected]
Suka Menulis


 Armbian
 Cyber Security
 Docker
 Linux
Linux Mail Server
 Monitoring
 Networking
 NGINX
NGINX PHP-FPM
 Self Hosted
 SysAdmin
 Ubuntu
 Wordpress